|
This is
what we started with. I bought it from a seller on eBay.
.jpg)
The head
was cleaned and all freeze plugs were removed. It was
also resurfaced, but was not at the 10.0 to 1 compression, which
was
fine with me. I gambled, hoping that it wasn't and won the
bet.
.jpg)
All in all,
it was in pretty good shape for starting out.
.jpg)
The core
plugs were all removed and it was cooked out well.
.jpg)
This shows
the head after getting it back from the machine shop and
getting it ready for paint prior to installation.
.jpg)
The shop insisted on coating
the head with a protector to prevent rust.
this type of coating makes for a great primer for the finish
coats.
.jpg)
I had new valve guides,
springs, stainless steel exhaust valves and
hardened seats installed. There was an additional .080"
removed.
.jpg)
I opted to
have the combustion chambers CC'd to verify the actual
compression and it was only 8.0 to 1, so I had plenty of metal
left
to work with to get it where I wanted it to be, which was 9.0 to
1.
.jpg)
Before
swapping the head, I ran a compression test on each cylinder
to insure that there would be no compression or ring wear issues.
All
of the readings were at 150lbs. across the board, so I had a good
start.
.jpg)
The plugs
were all good, actually a little lean, but more to follow on
that later.
.jpg)
I wanted to
do one last check, from the old days, to conform my
suspicion about the valve guides and it was correct. The
vacuum
gauge fluctuation is a sure sign of worn guides (if other things
are OK).
.jpg)
So,
everything looks good, let's get this ready to be installed.
First,
we need to make it look good.
.jpg)
After
masking, I used Dupli-Color High Heat Ceramic spray applied in
three even coats within one hour and allowed to dry at 75 degrees
for
a minimum of five days. It's extremely durable after that.
.jpg)
This is
what I had after drying and before rethreading every bolt or
stud hole.
.jpg)
.jpg)
.jpg)
I used taps to re-thread
every bolt or stud hole n the head, before
installing the new studs. I also used Never Seize on each
stud and
bolt, including the spark plugs.
.jpg)
I got all new studs and
matching nuts and washers from TRF.
.jpg)
I used the head stud kit from
ARP for the replacement of the originals.
Grade 8 studs and nuts with special lube and torquing
requirements.
.jpg)
Lastly, the completely
reconditioned rocker shaft assembly from TRF.
They did a great job on this. It's brand new, with a
hardened shaft.
.jpg)
Next, to the shop for
teardown. Erik at Her Majesty's Service did the
work as usual. I'm glad that the car was there after what
comes up
in the next few pictures. This was not the average five
hour swap.
.jpg)
So far, so good. Looks
easy up to now except for that rust around
the number three stud near the intake manifold.
.jpg)
Here's a closer look at the
rusted stud. This is going to be a problem.
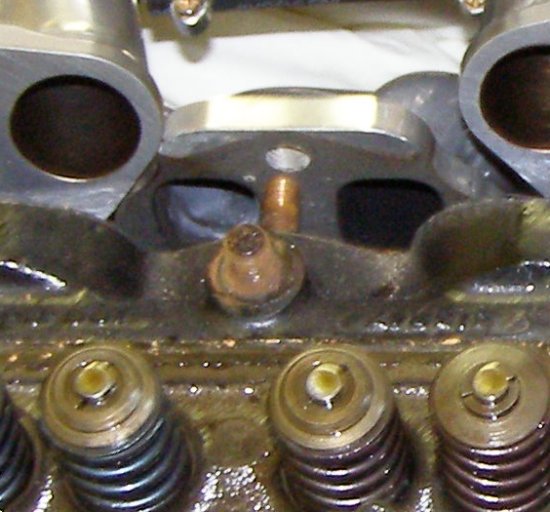
No matter how much soaking
with rust penetrator we tried, that corrosion
between the head and the stud would not break loose, so out came
the torches and the heat. Note that we had rope in the
cylinders as well.
.jpg)
Well, when all else fails,
use leverage. This took another hour of wrangling
with the weight of the entire front end pulling down to get it
apart.
.jpg)
Finally off and you can see
the three to four inches of rust that was
between the stud and the head causing it to rust together.
There is a
water jacket in that area and I've never had rusty looking
coolant.
.jpg)
Cleanup time begins and this
is tedious, but very important to do correctly.
Clean and tap all threads prior to doing the block cleanup as a
lot of
junk will come out of there. We re-cleaned the threads
after the
block cleanup as well to insure that everything was spotless
inside.
.jpg)
Getting closer, but the
threads need another cleaning and so does my paint!!
.jpg)
That's getting better.
I still have a nice cross hatch in the cylinder bore
after 55,000 miles. I guess that changing oil a lot does
help.
.jpg)
Time to install the ARP
Studs. You must use their supplied lube.
These parts are all coated with black oxide. The best that
you can buy.
.jpg)
All set and ready for the
Payem head gasket. Another expensive, but
top of the line part. Who wants to do this twice because
of a cheap gasket?
.jpg)
The Payem head gasket in
place. Nice sealing rings on cylinders and
on the oil passages at the end of the block.
.jpg)
This is a critical sealing
area, well know for the infamous "Oil leak at
rear of TR6 head" debate.
.jpg)
There is one hole on each end
of the head for oil into the rocker arm
shaft supports. It's very important that this is clean and
never blocked.
.jpg)
Now that the head is in
place, the ARP lube goes on the top of the studs.
.jpg)
It's also a great lube for
the rocker arms for the initial start-up.
.jpg)
Time to set the lash and Erik
hit it right on the money. Quiet as can be
after start up and getting it hot. This will be reset
after the head retorquing
in the next 500-600 miles.
.jpg)
I got the top & left side
ready while Erik played with the three manifolds.
These always require some tweaking to keep the carb shafts
aligned, but
we learned from the installation and it went quickly, this time.
.jpg)
Erik sets the curb idle and
we're ready for a road test on a nice sunny day.
.jpg)
After a very quick trip up
and down RT195, there are no leaks, so it's
clean up time and the finished product below.
.jpg)
All ready for the next 50,000
miles, but with the carbs, ignition
headers and higher compression, the ride will be a lot more fun.
.jpg)
Next project will be the NGK
Air Fuel Ratio Meter installation.
40 Industrial Road
Cranston RI 02920
(401) 352-0888
hermajestysauto@gmail.com
|
